COACHING BASICS – Natural Point of Aim
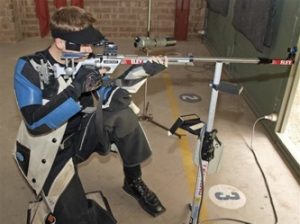
Natural point of aim describes the precise point where a rifle is aiming once an athlete is in position and completely relaxed. When an athlete first moves into position, relaxes and looks through the rear sight it is highly unlikely that the rifle will be pointing exactly at the centre of the target.
To correct this, there are two options:
- Adjust body position until the rifle points naturally at the centre of the target. This may be a case of shuffling feet, hips, elbow etc. to finely move the rifle around. This method may take several attempts, or
- Use upper body muscles to move and then hold the aim of the rifle onto the target.
If performed properly, the 1st option, whilst requiring more patience, will result in much more accurate results. The use of force in the 2nd option results in inconsistent shots, muscle tremors affecting the stability of the hold and ultimately fatigue.
COACHING BASICS – Breathing
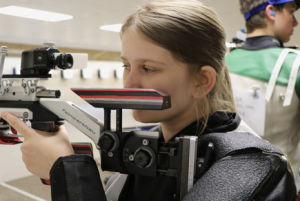
Correct breathing is essential in shooting. Oxygen is needed for muscle control, steadiness and clear vision. Breathing in and out naturally results in a cyclic movement up and down of the natural point of aim. Therefore, shots must be taken at a certain point in the breathing cycle:
Breathe normally until the rifle starts to settle, then:
- “Hold” the breath at the natural end of the exhale once the lungs are empty – do not force them empty!
- Stop breathing for only 4-8 seconds and release the shot when ready or try the cycle again.

COACHING BASICS – Sight Picture
Despite what you may think, 20/20 vision is not required to be a top target rifle athlete! In fact, many of the world’s best athletes in our sport wear glasses or corrective lenses.
Once the head is rested comfortably on the cheek piece at the correct height, the eye must be aligned with:
- The centre pinhole of the rear sight.
- The front sight / foresight tunnel and inner ring.
- And finally, the target.
This may be difficult at first but will become second nature after a few shooting sessions.
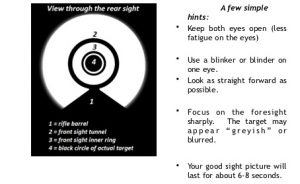
Rear Sight– this is closest to the eye and creates the outermost black circle in the diagram below. The size of the opening is sometimes adjustable but will often be set at approximately 0.9 – 1.3mm depending on the amount of light available.
Foresight– a metal or Perspex element is used inside the foresight tunnel at the front of the barrel with diameters ranging from 3.5 – 4.2mm.
Target – The target itself has a large black circle which is used to align with the sights of the rifle. The black circle of the target at distance will appear small and may be fuzzy, slightly grey or not as clear. This is ok. Once the circles are “concentric” i.e. aligned equally, it is time for the next challenge- squeezing the trigger!
COACHING BASICS – Trigger Control
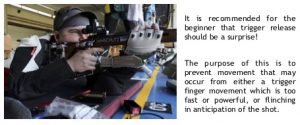
Once you are happy with your natural point of aim, breathing cycle and sight picture the shot can be released by carefully applying pressure to the trigger. Sound easy?!
Target rifle triggers require only a small amount of pressure to release. Light pressure prevents any unwanted additional force from moving the aim of the rifle whilst squeezing the trigger.
There are two basic types of triggers:
- Single Stage – where one finger movement releases the shot.
- Two Stage – where there is a first lighter movement, and the second heavier movement to release the shot.

Sensitivity of feel is required for the light-weight trigger and the first pad of the index finger should be used.
When the rifle settles, pressure is applied to the trigger and the shot is released. The recoil from these rifles is minimal.
Trigger release will become a semi-automatic response to a steady hold and good sight picture. Be willing to stop and start your cycle again if it does not feel right.
“Follow through” is a term used to describe the two seconds spent after releasing the trigger when an athlete does not move from their position. This prevents the athlete from disturbing the rifle position too early in the shot process and allows the athlete to see where the natural point of aim lies after the shot has been taken.
Ideally after a shot the aim should return to the centre of the target and anywhere else indicates that the natural point of aim was not quite correct to begin with.
An Analysis of 10m Air Rifle
Air rifles are slightly lighter than small-bore rifles and are shot from the standing position at a distance of 10 metres. The air rifle target and bullseye are much smaller than those in 50m shooting to compensate for the shorter distance! Air rifles are powered by compressed air and are fitted with air cylinders to allow a number of shots to be taken in a single session.
A basic standing position can be constructed by doing the following:
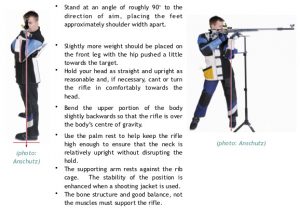
The position should be comfortable, within the rules and practical.
Your coach will adjust the sights closer to your eye and lower the rifle’s butt plate to allow for appropriate height alignment.
An Analysis of 50m Rifle
Prone is an excellent introductory shooting event requiring the least equipment to practice. Beginners will start off shooting from a supporting wooden block before moving on to using the sling, glove and jacket as they improve.
Prone is often considered to be the flagship event of shooting competitions and typically the most popular.
A basic position can be constructed by carrying out the following:
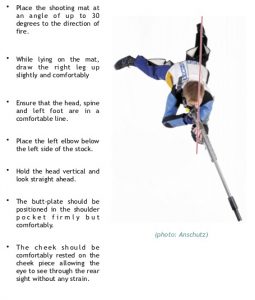
Your range staff will help you with all these details.
While prone may appear a simple position to shoot from, it requires work to ensure that you are staying as still as possible while completing the shot process.
Further Coaching Tips:
- Have fun!
- Attend your club shoots regularly.
- Try to use the same club gear every week.
- Keep referring to your checklist, as a reminder of the basics listed above.
- Read the guides and documents on the TRA website.
- Discuss shooting techniques with your range staff and fellow shooters.
- Experimenting to perfect your positions and technique is good but change only one thing at a time, then test and analyse with the coach.
- Take part in as many competitions as you can – remember these are graded so there is nothing stopping beginners from competing.
- When you have your own equipment, practise as much as possible.
- Learn about dry firing from the coach.
Tracking your progress:
A shooting diary is a very useful tool to help improve your skills. After any shoot record such things as:
- what produced the good shots
- how you felt when you shot well and not so well
- what you learned about the competition or training
- any changes made to your position or technique
- details of the range, the time of the match or training, the weather conditions, the scores and equipment settings.
Athletes at all levels will often refer to their diaries before important matches, when things start to go badly, to get them back on track, or after an excellent shoot to record a new or amended technique.
Your shooting diary is a good place to keep your checklist.
It is also worth keeping track of your scores each week and hopefully you will see improvements over time.
Score improvement is not just a case of getting the practice in at the range. Many athletes will carry out research on techniques, position etc. in their own time and apply this at their next range visit.
Further Coaching – Physical Exercise and Stretching
Good health and physical fitness are essential for the degree of control and stamina needed in shooting.
The recipe for success includes:
- a balanced diet
- general fitness training
- shooting-specific fitness training
- adequate rest
- avoidance of drugs, including nicotine and excessive alcohol
This provides the basis for an effective training programme which should include provisions for physical conditioning, technique training, mental conditioning and a gradual build-up to specific goals.
Performance enhancing drugs of any type are not permitted in shooting – this is especially with respect to the “Beta-blocker” type of drugs. Advise your coach if you are on any medication.
As with all Olympic sports, some drugs are banned, and testing is carried out at the elite level.
Stretching is essential for the target shooting athlete and stretches such as those shown here should be completed before every shooting session. For standing shooting, some core work is also very important.
Your club coach will be able to show you some simple stretches.
Advanced Coaching – The mind
Once the basic shooting techniques have been mastered, mental control assumes more importance. How you think about your shooting, and yourself is important.
At the highest level, about 90% of the athlete’s attention and effort is directed towards this area.
Once an athlete can complete one “good” shot, the challenge is to repeat the performance as many times as required in a match.
To achieve this, the shooter must have mastered the elements of technique and be particular about:
- Preparation
- Position
- Relaxation
- Breathing
- Hold
- Sighting
- Trigger Release
- Follow through
To succeed, target rifle shooters need a combination of determination, confidence and mental rehearsal. Self-discipline and visualisation are some of the mental tools used by top level athletes.
Champion Checklist
- Champions have desire. The will to work and chase improvement. They pursue excellence.
- Champions assess their potential for greatness – they know themselves, their strengths (and how to capitalise on them) and their weaknesses.
- Champions establish goals, they make them challenging to achieve yet attainable.
- Champions have dedication and determination. They know what they are willing to sacrifice to attain the goals they have set themselves.
- Champions have pride in themselves. Confidence comes with pride, and confidence implies that you have mastered your task and dispelled doubt and anxiety.
- Champions have (or develop) a willingness to work tirelessly – they never give up.
All clubs have experienced athletes who will help you improve your skills. There are also accredited coaches in many clubs—or see your State Coach.
You may just have what it takes….
Development Pathway for Smallbore Shooting
A clear pathway exists for ambitious athletes, which starts with weekly club practice! The next step is entering local competition prize meetings.
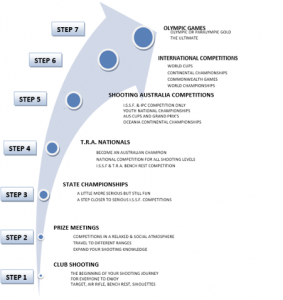
NOW GO OUT AND HAVE FUN SHOOTING
